Here we go for the fourth and last step in the Android port of Andy’s Super great Park. After having compiled the required libraries in Part I, having updated to the SDL2 in Part II and having switched from OpenGL direct mode to GLES in Part III; it is time to build the Android package and to execute the game on the phone.
In order to build the package, we will have to create a Java application to which will be attached the C++ part of the game. I will begin with a brief description of how Java and C++ code can be written to work together, then I will describe the creation of the Java project for our specific game using the resources provided by the SDL2. The third section will detail the build of the main shared object file, containing all the C++ part of the game, with the specifics of accessing the game’s media stored in the Android application package. Finally the build of the Android package will be detailed in the last section, both for a developer version and a release version.
About executing native code on Android
The primary language for Android being Java, running a native C++ application on this platform actually means that the Java application will be linked to native code using a Java functionality called Java Native Interface. The thing is quite easy if you only need to call C++ functions from Java but it becomes tricky when you want to call Java methods from C++. Thanks to the SDL it is possible to build the application with almost no work in the Java side.
Before detailing how I built the Android application for my game, I would like to describe the basics behind native code usage.
In order to make your native code available in the Java application,
you have to build a shared library and import it in the Java side
using System.loadLibrary(). On the Java side, the C++ functions must
be declared using the native Java
keyword. On
the C++ side, the function must be named following a specific syntax
recalling the full name of the Java class.
Let’s take an example. Suppose we have built the shared library
libbest-game-ever.so from our C++ code. In the Java side, we write
something like this:
package example.native;

public class BestGameEver {

    static {
        // Here I tell Java to link with the shared library.
        System.loadLibrary("best-game-ever");
    }

    // Implemented in the library. You can tell with the "native"
    // keyword.
    private static native doNativeStuff();

    public void doStuff() {
        // There the native code will be executed.
        doNativeStuff();
    }
}
On the C++ side we name the function with the Java prefix followed with an underscore and the full class name where dots are replaced by underscores:
void Java_example_native_BestGameEver_doNativeStuff
(JNIEnv* env, jclass jcls)
{
  // yep, I do stuff in C++
}
Calling a Java method from C++ is a bit more tricky. We need to retrieve the class of the object from the JNI environment, then the method to call, then we can call it. If the method has arguments, we have to convert them too.
Let’s say we add the public void method BestGameEver.doJavaStuff()
in our Java class. Calling the method from C++ would look like this:
void bge::some_class::call_the_java_method
( JNIEnv* env, jobject java_object ) const
{
  // java_object is an instance of BestGameEver. Here we retrieve its Java
  // class
  jclass java_class( env->GetObjectClass(java_object) );

  // From the class we can retrieve the method given its name and signature.
  const jmethodID method_id
    ( env->GetMethodID( java_class, "doJavaStuff", "()V" ) );

  // And we can call the method.
  env->CallVoidMethod( java_object, method_id );
}
Thanks to the SDL, during the initial port of Andy’s Super Great Park I did not have to call any function from one language to the other. Only for the second release did I need to call Java functions from C++ for stuff like opening a link in the phone’s browser. In case you need to call Java code from C++ too, the SDL provides some utility functions to help us, like:
SDL_AndroidGetJNIEnv()returns the JNI environement in which the application runs,SDL_AndroidGetActivity()returns the main Java class of the application.
Preparing the Android project
The SDL2 comes with a template directory structure for a typical
native application, named android-project and located at the root of
the library’s sources.
The first thing to do is to look at its content and to copy this folder in our game directory. Inside the directory we can find, among other things:
src/org/libsdl/app/SDLActivity.java: the main Java class of the application. Our application will inherit from it.AndroidManifest.xmlThe description of our Android application.
Since I use static libraries for my game, I had to edit
SDLActivity.java in order to comment out all the
System.loadLibrary() lines. You may also want to edit this file if
you need to load more SDL libraries, like SDL2_mixer, SDL2_ttf, etc.
Writing the activity class
Then I have created the main application class for my game, named
com.stuffomatic.asgp.ASGP and inheriting SDLActivity. As you can
see in the
commit,
the class is quite empty:
package com.stuffomatic.asgp;

import org.libsdl.app.SDLActivity;

public class ASGP extends SDLActivity
{
    static {
        System.loadLibrary( "gnustl_shared" );
        System.loadLibrary( "andy-super-great-park" );
    }
}
The second call to System.loadLibrary() effectively loads the main
shared object of the game. Also, since I could not find a way to link
statically with the gnustl library, I had to load it there too.
Configuring the application
The application is configured in the AndroidManifest.xml file. The
file provided with the SDL sets everything fine and I only had to add
few attributes to the <activity> tag:
<activity android:name="ASGP"
          android:label="@string/app_name"
          android:screenOrientation="landscape"
          android:launchMode="singleInstance"
          android:keepScreenOn="true"
          android:configChanges="orientation|screenSize"
          >
Here is the explanation of the values:
- name: the name of the class that implements the activity,
- label: the name of the application, as displayed to the user,
- screenOrientation: the orientation of the screen. I force the landscape mode to avoid the rotation of the screen in portrait mode, since the game cannot handle it.
- launchMode:
tells how the activity is launched. Since I do not want the game to
be relaunched when the user switches back from another application,
I chose
singleInstance. - keepScreenOn: tells to keep the screen on when the application is in the foreground. Without this flag the screen would turn off while the player watches the scripted sequences.
- configChanges:
the configuration changes handled by the application. I had to set
orientationin order for the SDL to be able to restore the game correctly when switching back from another application or from the lock screen. According to the documentation,screenSizemust be set whenorientationis set.
Creating the main shared object file
Because of the way our engine works, Andy’s Super Great Park was already built as a shared library. Thus, the work required in order to use it in the Android application was quite low. After the work previously done to port the game (compiling the required libraries, updating to SDL2 and from OpenGL direct mode to GLES), I have been able to compile the various libraries that make the game. Now I only need to link them together in a shared library which will be added in the APK file.
This shared library is built from two source files. The first one is
provided with the SDL2, in the source archive at
src/main/android/SDL_android_main.c. Since I use C++, I had to
surround its content with an extern "C" {} block. The second file
contains our main() function:
#include <SDL/SDL_main.h>

int main( int argc, char* argv[] )
{
  game_loop();

  return 0;
} // main()
Easy, isn’t it?
I could not manage to configure the compilation of the final shared library with CMake, mainly because the project uses a lot of libraries which must be linked together with different flags. The most straightforward way I’ve found to compile the library has thus been to write the g++ command myself and to put it in a script. The command looks like this:
arm-linux-androideabi-g++ -fPIC -shared \
    -Wl,-soname,libandy-super-great-park.so \
    -Wl,--export-dynamic -rdynamic \
    ${INCLUDE_DIRECTORIES}
    ${CPP_FILES} \
    -o 'path/to/java-project/libs/armeabi-v7a/libandy-super-great-park.so' \
    ${LINK_DIRECTORIES} \

    -Wl,--no-as-needed -Wl,--whole-archive \
    -lrp \
    -lbear_generic_items \

    -Wl,--as-needed -Wl,--no-whole-archive \
    ${BEAR_ENGINE_LIBRARIES} \

    -Wl,-Bstatic \
    ${OTHER_LIBRARIES} \ # Claw, jpeg, png, Boost, SDL2, intl
    -lsupc++ \
    -lstdioext \

    -Wl,-Bdynamic \
    -lgnustl_shared \
    -lz \
    -lGLESv2 \
    -lGLESv1_CM \
    -llog \
    -ldl \
    -landroid
The first lines are quite typical: I tell the compiler which sources to compile, where to find the headers and the libraries and how to name the result.
The second part concerns the libraries of items from the game and from
the engine. The classes declared in these libraries are almost not
referenced anywhere in the code. Actually, most of them are
instantiated only when loading the levels, using factories. If I link
them using the default linker flags (which include --as-needed and
--no-whole-archive), the linker will drop their content, since it
won’t find any references in the code. In order to have their code
available in the final binary, I must force these libraries to be
included as is using the --no-as-needed and --whole-archive
arguments. It is a way to tell the linker not to try to be smart.
The third part links the libraries of the Bear Engine, which are
compiled as static libraries. For them, I can restore the default
behavior by setting --as-needed and --no-whole-archive again.
The fourth section links the various libraries used by the
engine. Since these libraries may be available as static or shared, I
force the use of the static version by setting -Bstatic.
Finally, the last section lists the libraries which I could not link
statically. For them, I force the shared version by setting
-Bdynamic.
You can find the complete compilation script on GitHub.
About accessing the game’s resources
The game’s resources are usually read from the hard disk, from the directory where the game is installed. For Android applications, there is no such thing as installing the application’s files; the resources are stored in the application package and that’s all. From there we have only two options which both require to extract the resources from the package: either do we use the extracted resource on the fly or we save it on the external storage as needed and load them from here in future runs. The latter may result in faster loading time on multiple runs, at the cost of a larger consumption of the user’s storage.
For Andy’s Super Great Park I chose to use the resources extracted on the fly. It is the solution which requires the less work and the performances appeared to be good enough.
Once again, the SDL provides a function to help us, namely
SDL_RWFromFile(). If the
resources of the application are stored in the assets directory of
the package (i.e. in the assets directory in the Java project’s
directory), then passing the relative path to this function will open
it as if it was a regular file.
Since the Bear Engine already had a
resource_pool
object to abstract the access to the resources, which returns a
std::istream from the relative path of a resource; using the
function of the SDL was quite straightforward. I had to adjust the
existing resource_pool to accept different implementations, then I
wrote an
implementation
which uses SDL_RWFromFile().
Building the APK and running it on the phone
Let’s recap what we have in our Android project directory now:
android-project/
|- assets/                              # The resources of the game.
|- libs/armeabi-v7a/                    # The native part of the game.
|  |- libandy-super-great-park.so
|  |- libgnustl_shared.so
|- res/                                 # Various resources of the
|                                       # application, including its
|                                       # icon.
|- src/
|  |- org/libsdl/app/SDLActivity.java   # The Java Android application
|  |                                    # as provided by the SDL2
|  |- com/stuffomatic/asgp/ASGP.java    # The Java Android application
|                                       # of our game
|- AndroidManifest.xml
In order to build and test the APK, all we have to do is to enter the
android-project directory and to type the following command:
$ ant debug
At the end of the build the Android package can be found in ./bin,
namely ./bin/ASGP-debug.apk for my game.
This command builds the Android package in debug mode, which means
that it is signed with the default debugging key. The package can be
installed on a device using the adb tool but it cannot be submitted
to the Play Store.
In order to install the package on the device, we must enable the
developer mode in
Android
then plug the device on a USB port. The device should appear in the
list printed when typing adb devices in the shell, along with its
identifier:
$ adb devices
List of devices attached
0123456789      device
Write this identifier somewhere as it will be required for future
access to the device with the adb tool. In the following, this
identifier will be denoted by $DEVICE_ID.
With this information, we can finally install the package on the device:
$ adb -s $DEVICE_ID install -r bin/ASGP-debug.apk
The first run is very exciting. Let’s open the phone’s applications menu and tap the game’s icon. Then…
Well… not so bad for a first run, but totally not playable. Actually I
made a little mistake in the computation of the vertex colors when
converting the OpenGL code and the screen is not in the right
orientation (it was prior to setting the configuration in
AndroidManifest.xml). Once these problem were fixed, here is what I
had:
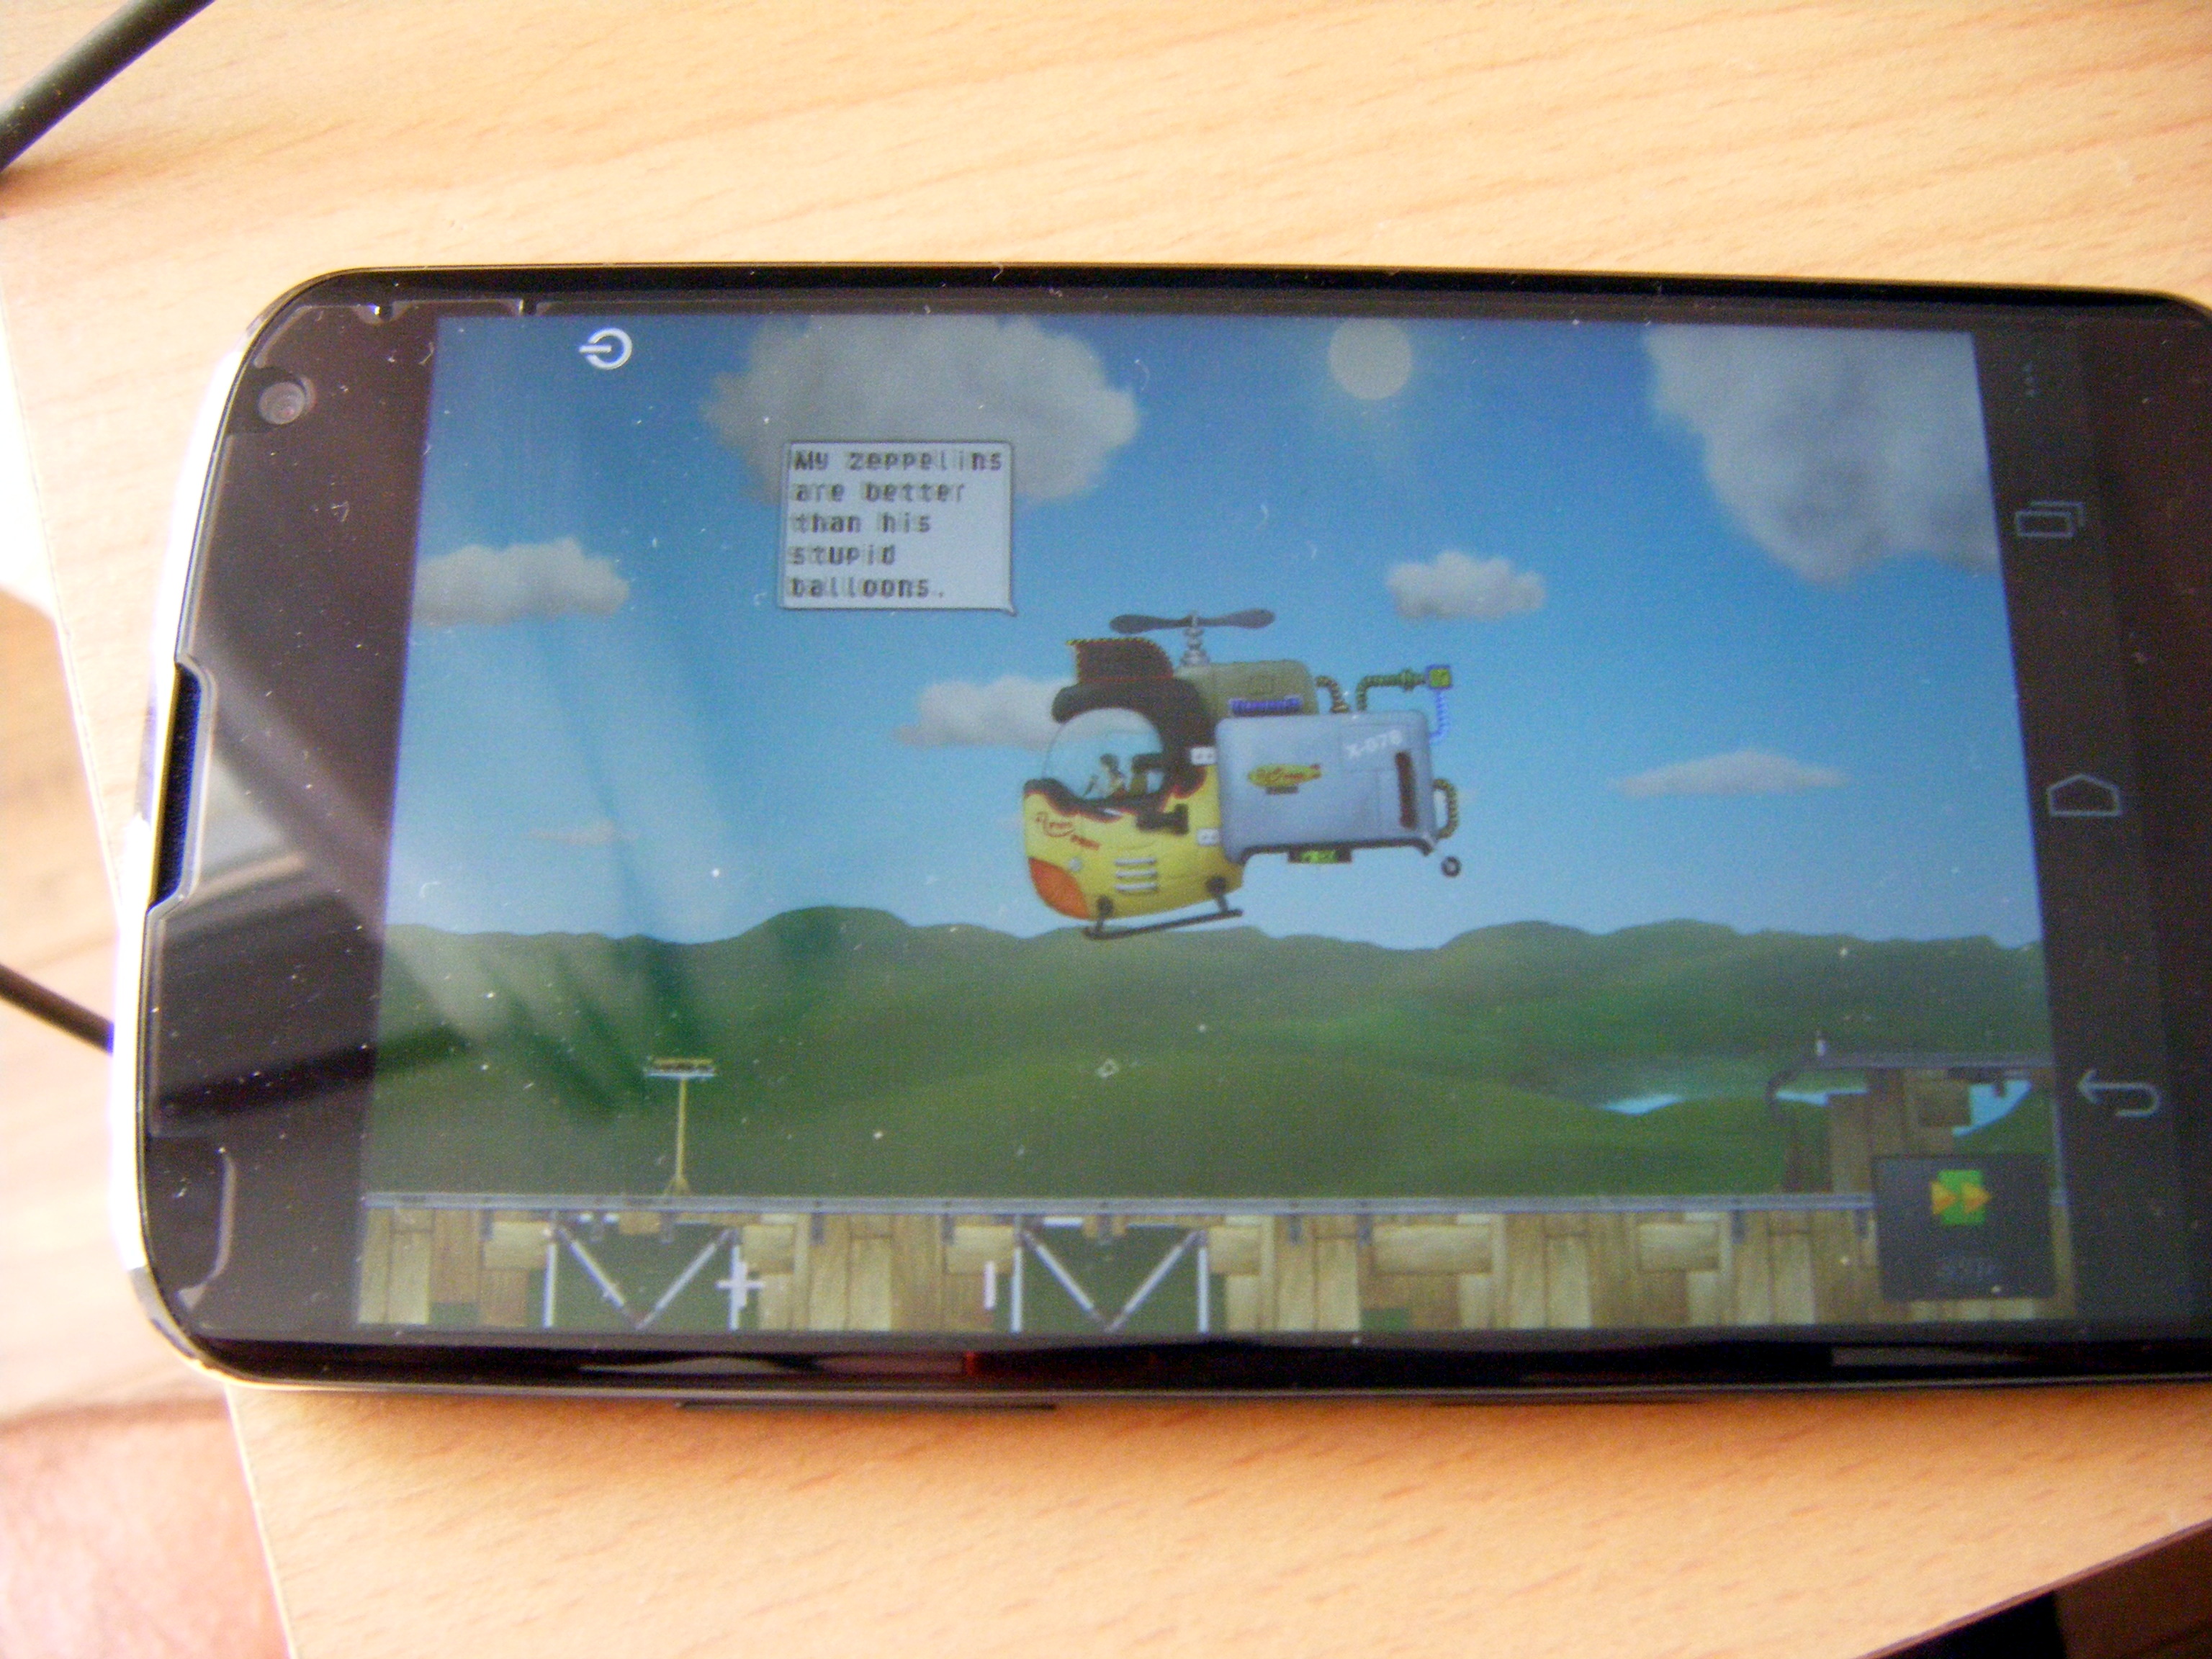
Great!
Building the final APK
As stated before, the debug package of the application cannot be submitted to the Play Store. The process of building the final package requires some extra steps which I explain below.
The first thing we can easily do is to build the package in release
mode, using the ant release command in the Android project’s
directory. It will build an intermediate package in the bin
directory, named ASGP-release-unsigned.apk for my game.
As the name suggests, the package is not signed. We will need a
private key in order to sign it, which we can
generate
using the keytool command. For example:
$ keytool -genkey -keystore ~/.keytool/stuffomatic.keystore \
  -alias gplays -keyalg RSA -keysize 2048 -validity 10000
Once we have our key, it is easy to sign the package using the
jarsigner tool:
$ jarsigner -sigalg SHA1withRSA -digestalg SHA1 \
  -keystore ~/.keytool/stuffomatic.keystore \
  ./bin/ASGP-release-unsigned.apk gplays
The package must then be aligned (I don’t know why, but the documentation says it must):
$ zipalign 4 ./bin/ASGP-release-unsigned.apk ./bin/ASGP.apk
And that’s it. We can now submit the final APK to the Play Store.
If you try to install this package on your phone using the adb
command, ensure that you have uninstalled the previously installed
debug package. Otherwise the installation will fail with an
incomprehensible message.
What’s next
Well, I didn’t think this part would need so many words! At the end of it, I am able to run Andy’s Super Great Park on my phone and to release it on the Play Store. It would be a lie to say the game is actually ready to be released as is but it is still quite a nice achievement.
In this state, the game ran at most at 15 frames per second, which is very far from the 60 frames expected. I had to rework some parts of the engine in order to obtain a decent frame rate, one of them being to put the rendering work in a separate thread. Also, the translations did not work well and I had to spend some time to fix some errors in libintl-lite and to find a way to retrieve the phone’s locale in native code. Finally, I had to handle the finger events and to adjust the controls in order to be able to play. These may be interesting parts to talk about in future notes too.